Tutorial
Planning a four lane Ninco club track. Part 4
So we've now completed a first draft of our track layout. The next stages of the process are to....
- Publish the track plan for general discussion
- Produce plans for building the track
Publishing the layout
There are several ways to publish or share our track layout plan for discussion and further planning.
- We can print off the layout
- We can upload an image to a photo sharing site
- We can publish the circuit report to our own website
- We can publish to the Ultimate Racer website
We're going to do all of those things
Save layout image for printing or uploading
Saving an image is simple. We go to File > Save As and in the dialogue box that opens, change the Save as type from UR30(*.scc) to JPEG(*.jpg), Bitmap(*.bmp) or GIF(*.gif).
We can then upload the image to a photo sharing website, post it to a forum or print it off.
Publishing to our own website
Our club has it's own website, so we'll use the Track Layout report to publish the layout on our site.
First we go to File > Publish on the web, and enter the details for our website; name, URL, log-in and password. Then we can simply choose the appropriate report and click Transfer
The report is published to our website and the link can be passed on to our members
Publishing on the Ultimate Racer Layout Archive
We'll also publish our layout to the Ultimate Racer Layout Archive
First we go to File > UR30 WWW, fill in our email address and click Submit to get a password. When we've received a password by email, we can go back to File > UR30 WWW and type the password in.
Now we can use the layout archive whenever we want, just choose the opened layout we want to upload and click Submit.
Track Building Plan
When it comes to actually building our track layout, we'll need more than just the plan, we'll need to know the reference numbers or names for each piece of track.
![]() First we click on the Select Object layer button to hide everything but the track itself
First we click on the Select Object layer button to hide everything but the track itself
![]() Then we click on the Wire Render button so we can clearly see the outline of each track section
Then we click on the Wire Render button so we can clearly see the outline of each track section
![]() Finally we go to View > Preferences and switch on the Display section reference (or alternatively Display track name)
Finally we go to View > Preferences and switch on the Display section reference (or alternatively Display track name)
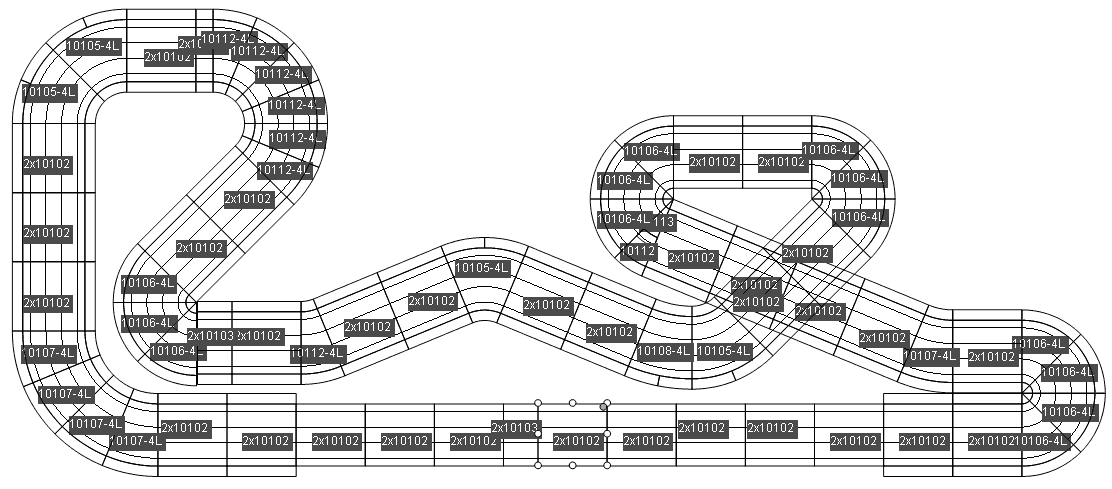
Here is the plan with track reference numbers displayed

Track Stocks
Our club already has a large stock of Ninco track, though not quite enough to build a track of this size.
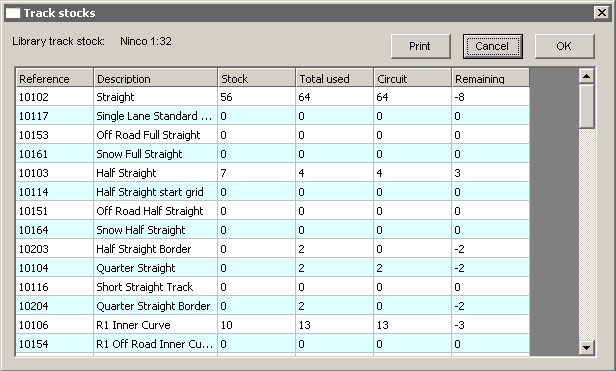
![]() We can use the Track section stocks tool to find out how much new track we'll need to make this layout.
We can use the Track section stocks tool to find out how much new track we'll need to make this layout.
We've already entered the track we have in stock, so we can easily see how much new track we'll need.

That's all
We'll probably refine this design according to feedback, we might also design some alternative layouts, but that's the outline of general process.